|
Holley 4 bbl Spreadbore 450cfm Model 4360 |
|
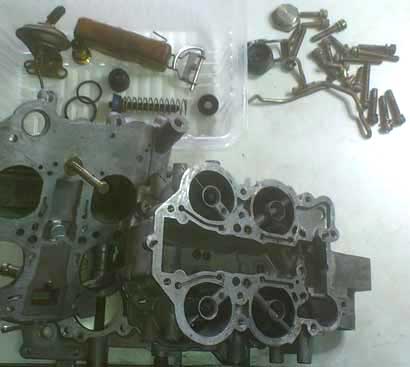
For models 4360, fitted as an aftermarket carb on most V8's. The rating of this carb is 450CFM with mechanical secondary operation and is a spreadbore although only just. The secondary barrel is not much bigger than the primary. The biggest difference this carby has to the norm is that it pulls apart upwards instead of sideways. Most people associate the holley to the traditional fuel bowl, metering block and body bolted to the base. However this carb has only three body parts. The base the body and the top. Not many parts in this model at all, as seen in the photo. This model just did not take off as it should have. I believe this is because the way it disassembled and also the problem with the gaskets splitting and sticking. These factors made it time consuming to rejet or develop the carby for extraction of horsepower. However I have personally had great success with this model on many various engines with the specific intention of bettering the fuel economy compared to the original carby. These were a strict fuel economy based carburettor. I fitted many of these to 253 -400 cu in engines with great results on economy and some surprises on power increases in the smaller engines.
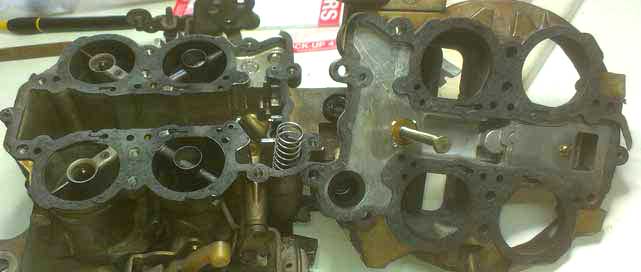
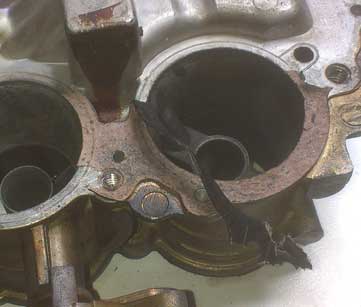
That's it, how easy is that, nothing complicated at all. However don't be fooled by its simplicity. There are a few things you need to ensure to make sure the re-kit is done properly. When this carby is pulled apart for the first time it will be a dog to remove the gaskets from all the parts. The two gaskets used to separate the main parts are very thick and when seperated will split and stick to their mating surfaces. Out with the razor blade and carefully remove the gasket material. The top gasket will be a battle most of the way. Do not cut into the raised sections with the blade. These raised bids help to seal the gasket properly.
The gasket between the base and body will be much easier as it may peel off fairly easily with only minor razor blade use.
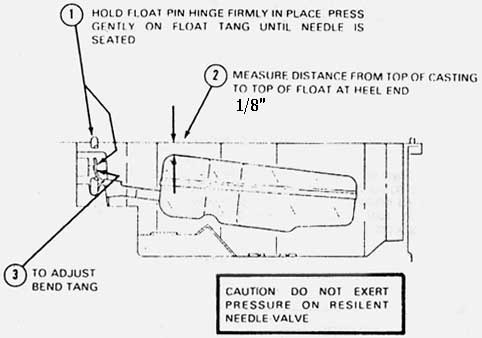
Once all the gasket material has been removed, check for warpage of the gasket mating surfaces. Since the gasket is quite thick there is a little bit of allowance made for distorted parts. Make sure you have compressed air available to blow out all the passages as the gasket material does make its way into them and will cause problems if not removed. Install the pump boot (22) into the top section and assemble the pump plunger (19 20 21) complete with the linkage arm (17 18). Make sure you re-peen the power valve plunger if you removed it and ensure it moves freely. If you have a vacuum pump available, test the operation of the plunger and ensure it lifts at an appropriate setting for your engine needs. Screw the body (38) to the base (43) tightening the screws (37) evenly and to 30-50 in lbs Install the power jet and spring assy (34) and any jets you removed back in the right places. Fit the needle & seat assy (31), refit the float and set the float level as per the specs below. The washer at the base of the needle assy is a very firm fit. Do not distort it trying to push it down the needle body assy. Refit the top section (15) and carefully guide the pump plunger into its bore and continue on until the top is in place. Tighten the top retaining screws (13)(14) to 20-30 in lbs. Now fit the connecting linkage to the accelerator arm and adjust. If you have the choke operational then adjust it as per the instructions. Idle adjustment needles (41) - turn in until lightly seated then back out 2 turns. The needles are turned in to lean the mixture and out to richen. If you strip the thread in the bowl of the fuel inlet fitting (24), this can be repaired using oversize inlet fittings that cut their own thread as they are screwed into the body. Ensure though that once a new thread is cut that you dis-assemble the bowl to clean out the alloy metal filings. This would be best discovered before you start to assemble the main parts. Perhaps installing the inlet fitting would be the very first part you assemble to save you heartache later. Your pretty much done, fit it up and make final adjustments to mixture and idle speed. Since this is a lean burn carby I will include the specific instructions, however I would recommend only to lean the mixture to the first step and no leaner. Adjust mixture until highest RPM achieved, reset idle speed and adjust again in the same manner. Then turn in the mixture screws until speed drops approx 20RPM. Stop there. If you want it leaner then turn in the screws a further 1/8 turn.
|
|
|