|
Holley 2 bbl model 2300 |
|
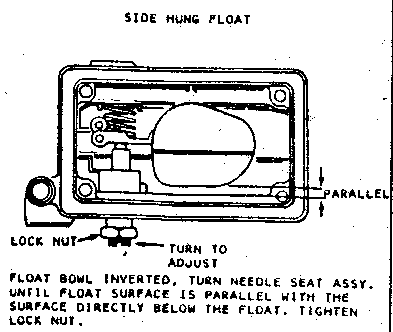
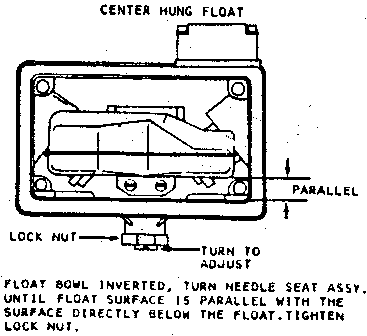
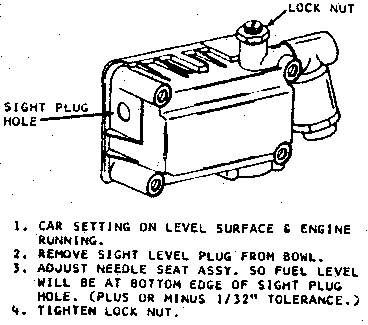
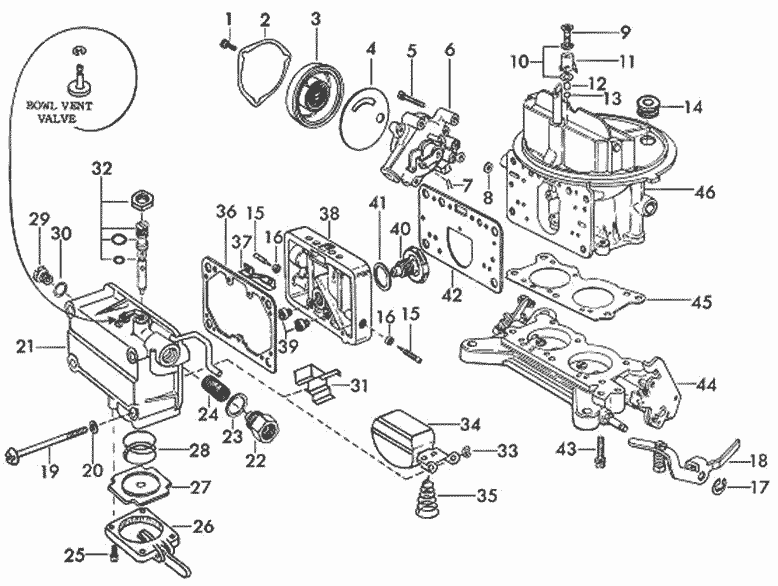
This carby has been around for quite some time. The older style has a side entry fuel fitting with side hung float and the needle & seat fitted off to the side of the bowl and comes in 320 & 350cfm. The performance model has centre bowl inlet fittings and centre slung float with the needle & seat in the centre of the bowl and comes in 350 & 500cfm versions. The 2300 comes stock on many American vehicles from the 60's and 70's. The late model 350/500 is fitted as an aftermarket carb on most V8's and 6 cylinder engines with the 500 version fitted for more performance orientated engines. This general schematic and parts shown will vary from carb to carb, so not all components will be present. Idle mixture adjustment needles (15) - turn in until lightly seated then back out 1 turn. Some late model carbs have a reverse idle mixture adjustment. The needles are turned in to richen the mixture and out to lean. To tell which ones you have, take a look at the tips of the screws. A sharp taper is the normal set-up, a blunt taper is the reverse mixture screw. Another method is to screw the mixture screws all the way in. If the engine stalls, then you have normal screws, in for leaner. Lubricate all 'O' rings (32) before installing with either vaseline or rubber grease. Make dry float level adjustments before fitting the fuel bowls, then check once engine is running using the wet method. On a genuine needle & seat assembly the locknut on the needle and seat is not a locknut, it is simply the adjustment device. If you try to tighten this nut in an effort to stop a fuel leak, you will strip the thread in the fuel bowl. The correct way to adjust the needle is to hold the nut still with a spanner & then loosen the screw cap away from the nut. Now the nut can be turned to adjust the float level. If excessive fuel comes from the gasket then just lightly nip up the screw cap to the nut and then turn the nut to adjust float level. Don't tighten the screw too tight at this stage. The nut must be free enough to adjust the float level and small fuel seepage from the gaskets is normal. Once the float level is correct, hold the nut still and tighten the screw cap up to the nut. If fuel leaks from the joint, then replace the two thin washers on either side of the nut. On aftermarket needle assemblies the locknut is a locknut. The needle itself has a screwdriver slot cut into the head and the nut is 'O' ringed on the underside to seal the fuel. If this is the assembly you have then to adjust it is a little simpler. Hold the needle assy from turning with a suitable flat blade screwdriver and loosen the lock nut. Turn the screw up or down to adjust level. Then hold screw still while tightening the locknut up against the 'O' ring. DO NOT use excessive force on the locknut as you will strip the thread in the fuel bowl. If you do strip the thread, an oversize thread needle & seat is available, but will require a special tap to cut the new thread. If you strip the thread in the bowl of the fuel inlet fitting, these too can be repaired using oversize inlet fittings that cut their own thread as they are screwed into the bowl. Ensure though that once a new thread is cut that you dis-assemble the bowl to clean out the alloy metal filings. If you use a cheap carb kit (not cheap in price) (DO NOT use a GOSS kit, they are not up to standard) then probably you may have trouble sealing the inlet banjo fuel fitting on the washers (23) if you have this type of inlet fitting. The washers are aluminium where-as the genuine Holley kit uses an alloy washer coated with a neoprene type rubber and this seals easily without using exessive force on the banjo nut. Avoid using any kit that has a cork gasket for the metering block (42). The only exception to this is when you re-kit a carb that uses self taping screws in the fuel bowl to tighten it to the metering block & main body. If you are unsure of what I mean then see my article in the Archives about my all night carby saga.
|
|||
|
|


