|
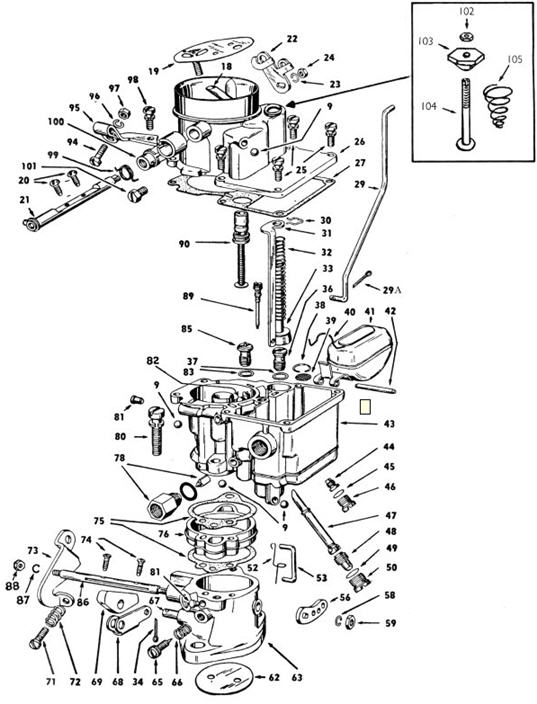
The good old Holden carb, reasonably easy to repair. Some of the names in the parts list may not be actual names used in the parts manual. I had to name most of the parts from memory.
Generally the Stromberg carbs are very reliable. As with most carbies throttle shaft wear is common and is easily fixed by fitting an oversize shaft or a standard shaft with bushes. Worn shafts cause hesitations in the operation of the accelerator pump. Sometimes the lead balls (9) will leak fuel. If you can't get the lead then drill them out and use the correct size ball bearings, they will seal but once in, you can't ever get them out which means you can't clean out the passages
properly in future rebuilds. Also if you accidently hit them in to far, you a up the creek. Anyway for the DIY rekit you would never remove the lead plugs in the first place, unless they were leaking. Only professional rebuilders do this to clean out the passages properly during a major rebuild not a simple re-kit.
|

|
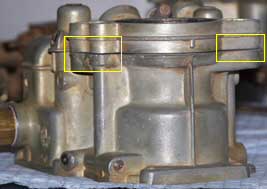
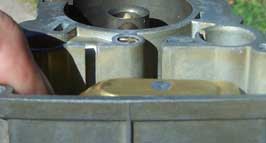
Warpage occurs at the intermediate plate and body of the carb. You can choose to do nothing and fit new gaskets and you should be OK. Picture shows the warpage clearly once the plate is surfaced. Surface the plate on a sheet of 80 grit wet & dry if you decide to go ahead and straighten it. |
|
|
A warmed up carby makes straightening much easier and a press is the ideal tool to use.
However without a press, use a small hammer, carefully hit the carb body in the yellow areas to straighten the surface. Don't smash the surface to hard, it only take a few firm hits to make it straight. Don't go over straight. All you want is for the gasket to seal the two galleries. One is fuel for the idle & progression circuit the other is the vacuum supply to the power valve plunger.
|
|

|
If the pump rod has a lot of lateral movement in the body slot then a little panel beating to the edge of the slot is required. This is a rather crude way to fix it but it works and lasts until the next re-kit. I use a pin punch about the width of the slot & give it a far hit from the side. Make sure the rod fits nicely & moves without binding. You won't get rid of all the lateral movement & I would advise you don't try to. All that will happen is the rod will
stick & you will have to hit the rod laterally to undo the panel beat. |
|
|
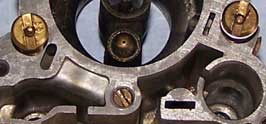
Make sure you fit the power jet under the power valve plunger. The power jet has the pin sticking out. To test the jet for serviceability, simply put it in your mouth to seal the head (pin towards your mouth) & suck on it. If you can draw in air the valve is leaking & needs replacing. The extra fuel required for power enters through the top of the jet where the pin is and exits through the hole drilled in the side |
|
|
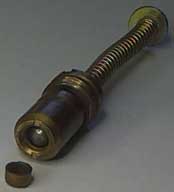
There is a small welsh plug fitted in the power valve plunger. It will eventually pop out and will cause the power valve to stay on. The easiest way to fix this permanently is to fit a ball bearing in, just like in the pic.It will never come out again, ever.
|
|
|
The fuel level setting is 5/8" to 11/16" below the top surface while the engine is running. This is a bizarre way to do it in my books, however this is the Holden way. Here is how I have done it from the beginning of time, statically on the bench during reassembly, never had a problem. Set the float level so that the top of the float is just off parallel to the top of the carby as shown to the left. Just press lightly on the float tang with your finger against
the needle & seat. Adjustment is done by simply bending the tang.
|
When you fit the accelerator pump plunger, dip it in petrol first then flare out the cup end. Fit it into the bore using a circular motion so the cup slides in easier without getting caught. With most of the carby assembled less the air horn (26) put some fuel into the bowl. Test that the accelerator pump works as soon as the throttle is opened and the movement of the pump plunger is instant. If the throttle shaft is worn then don't expect good results. If the pump still lags a little, there
is a spring called 'lost motion spring' Part # SBP-043 from Fuel Mizer. This should fix the accelerator lag problem. I fit these to just about every re-build now.
|


